I have a love affair with still photography. Since a child, I have loved looking at the photographs entered in the county and state fairs. The emotions portrayed in photos from historical events always move me. It’s been a goal of mine to learn how to take quality photos of our family and activities that we do together.
For my birthday, my husband surprised me with a new camera, a Canon D80. To say that I love it would be an understatement.
But with all of the buttons, dials, and menu options, I didn’t know where to start. So, I spend free time on our camping trips and vacations learning how to use it. Using the owner’s manual, the book Understanding Exposure, and some other tips gathered here and there, I feel like I finally have a foundation to begin taking the quality photography that I desire.
Because I know many of you are overwhelmed with words like aperture and ISO and with family vacations on the horizon, I thought I would take a moment to share what I learned. But before I do, please understand that I am not a professional so please don’t shoot me (pun intended) if I am not technical in all my explanations. Also, I am simply explaining what I have found helpful and I’m not going to explain the why’s.
The Big 3
At the heart of photography is what author Bryan Peterson calls the “photographic triangle.” This is made up of aperture, shutter priority, and ISO. All of these affect the focus and light of the final product. Let’s see if I can explain the difference and when to focus on each.

Aperture
Aperture controls the amount of light that hits the film or digital media while taking an image. Amount of light is the key. A camera calculates the amount with the term f-stops. The smaller the f-stop number, the larger the opening (allowing more light in). The larger the f-stop number, the smaller the opening (allowing less light in).
When I think about aperture, I think depth of field. Do I want only that close to me in focus or the entire scene?
Use a smaller number (f/2) for a shallow depth field. This will result in a blurred background and lighter image. I use this when I am taking an image of a child and the background is not pretty. On the reverse, a larger number (f/22) creates a narrow opening and produces an image where the entire depth is in focus (think landscape photography). If you don’t care about the depth, an f-stop of f/8 to f/11 is a great choice.
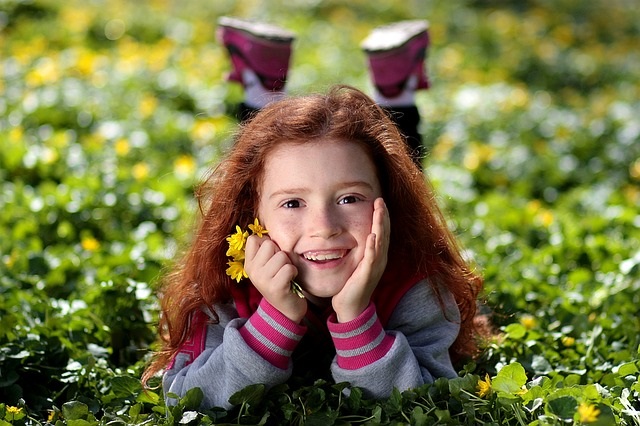
The image above is a good example of a low f-stop which makes the little girl and close flowers in focus while the flowers in the back are blurry.
Here are two images that I took to make it extremely obvious the different between low and high aperture.
Notice how you can easily you can see the JellyTelly tumbler and the Ticket to Ride game. This image was taken with a high aperture.

In this image below, I lowered the aperture and the game box in the background is very fuzzy while the JellyTelly tumbler is clear.

Shutter Speed
Shutter speed is the amount of time that the light hits the film or digital media while taking an image. Amount of time is the key. A camera calculates the amount of time in fraction of a second though only the denominator may be expressed on your camera. The higher the denominator, the shorter exposer which creates a darker, less blurry image. The lower the number, the longer the exposer allowing more light in to create a brighter, blurry image to imply motion.
When I think about shutter speed, I think about motion or action. Do I want the motion to be crisp to freeze the action or blurred to imply motion occurring?
Use of a smaller denominator (1/2 sec) shows motion and is perfect for night and blurry images. Understand that shutter speeds this slow requires a tripod or firm surface. Using a higher number (1/8000) will freeze the action due to the faster shutter speed. A shutter speed of 1/100 is great for a sunny day.
The following images were taken of a running ceiling fan. In the first image I used a lower number to show motion in the moving fan.

In this image, I wanted to remove the motion and so I put the camera on a much higher number (1/8000) to increase the shutter speed.

ISO
ISO is the speed or sensitivity to light. The lower the number, the crisper the photograph will be.
Due to my preference or just lack of experience I do not adjust the ISO. I focus only on aperture and shutter speed.
Pretty cool, huh? For those with vast camera knowledge, thank you for your patience. And for those who leave your camera on automatic mode, I hope that you will give a few of these tips a try. Here’s to beautiful summer photos!

Planning a Vacation? Check out this helpful blog posts:
Family Vacation 101
Hotel Rooms, Vacation, and Kids: 16 Tips to Success
Tips to Taking a Rocky Mountains Family Vacation
Camping as a Family tips and Lesson Learned
Free Printables:
Road Trip Activity Workbook
Packing List
Travel Journaling Printable (For Blog Subscribers)
