To begin our Family Vacation 101 blog series, I shared the importance of choosing a good location. What that looks like and how to find it. Be sure to click to read these tips if you missed them.
Today I want to focus on the laborious task of packing. (I can hear your “ughs” now!) But hopefully when we are done, you will feel more prepared to pull the bags and suitcases out from the closets and under the beds.
Before sharing our Packing List, let me explain a little about our most recent vacation and daily activities so that you can adjust your packing list based on what you plan to do.
Our latest trip was to the beach. We chose to rent a condo for reasons explained in the last post. Each day basically looked the same.
After breakfast in the condo, we headed to the beach. Sitting right on the edge of the water, the kids were instructed where they could play. For us the rule was that they had to stay in front of our chairs in a 20-30’ path. Basically, they had to stay in my line of sight. This made it easy for me count – 1, 2, 3, 4. The kids took breaks once an hour to get a drink and/or snack. Also we had regular breaks to reapply sun screen.
Around 1 or 2:00 in the afternoon we headed back to the condo for showers and a late lunch. Then Little Man took a nap, we played a game, or just relaxed on the balcony. Around 4:00 we headed back to the beach. This was a great time because we were setting up while most were leaving. We ended up at the lazy river and slide before journeying back to the condo for supper, a second-set of showers, and bed.
Tip: It is much easier to see your children when the beach is less crowded. Mornings and evenings were the least populated times at our beach.
With that said, here is our beach packing list.
1. Swim/Beach Gear
With a beach vacation it is typically a safe assumption that you plan to spend a lot of time in the sun and water. Thus, the bulk of our packing centered around beach.
Hats – I searched high and low for good sun hats. Found these Sunday Afternoons Fun Bucket Hats on Amazon and was very happy with them. (Got myself one too!) Offered in several colors, the rims covered well and didn’t flop down. The oldest two used a Youth sized hat. I purchased the same size for the younger two kiddos thinking they could grow into them and it wouldn’t matter if they were a little big. My plan failed. I should have gotten Peanut (age 4) and Little Man (age 7) the child’s size. These hats will be used all summer whether working in the garden or playing at the pool.
Swim Shirts – We only had one swim shirt for each child and definitely wish I would have had purchased a second. This shirts are invaluable at the beach and pool.
Sunscreen – Lotion sunscreen was applied before heading to the beach. No sand could get mixed in which helped with this sensory-overloading process. Even though it is a little more expensive, we used spray sunscreen on the beach for simplicity.
Sun Protection – We brought a canopy thinking it would give us the best protection from the sun. And it would have been perfect if we were alone on the beach. Unbeknownst to us, canopies had to be placed behind all umbrellas. Since we wanted to be right along the water’s edge this wouldn’t work. We purchased a beach umbrella which worked really well. The pole tilt adjustment made it easier to track the sun. We took two chairs but it would have been nice to have a couple more for the kids. If traveling space is limited, many places offer rental of umbrellas and chairs. At our condo unit, these were set up behind the umbrellas.
Note: On the last day we left our umbrella and chairs on the beach while we went back to our condo for lunch. There were several families who left their supplies at the beach the whole time – day and night. Of course this is a gamble but made it so much easier than lugging everything down and back twice a day. We would probably leave those large items again. But understand there is a risk that something may be missing when you return.
Note #2: Several friends suggested that instead of renting, purchase an umbrella and chairs at a local store and then pass them on to another family before leaving. This blesses others and keeps you from having to travel and store the beach items once home. We had room so we traveled with the items.
If you have small children who will be napping on the beach or playing only in the shade, I really liked the looked of the Beach Tents that I saw on the beach. More protection than an umbrella but still able to be used on the shoreline.
Baby Powder – I have read this secret on Pinterest for a while and it is so true. Baby powder is great at getting the sand off little bodies. We used this on our hands before eating a snack.
Towels – Even with a washer and dryer in our condo, I wish we would have brought two towels per person. But we made it work with one.
Swim Toys – Instead of bring a bag of beach buckets and toys, I purposely packed kitchen items in plastic containers that I didn’t care about for the kids to play with in the sand. Upon leaving, the containers were thrown away. We also enjoyed bodyboards, shovels, fish nets, and snorkel gear. A mesh bag would have been best to carry all of this but I used a humongous Ziploc bag that I had instead. We also required the kids to wear life jackets while swimming in the ocean.
Beach Mat – I read several reviews on what to lay on the beach without having to sit in the sand. Fitted sheet was one idea. I tried a picnic table cloth. Nothing worked well. Purchasing an expensive beach mat didn’t seem logical either. Instead of fight the sand and continually remind the kids not to step on the mats, we used chairs and laid towels down. Seemed the best since feet were covered with sand and it was a pointless battle.
Water bottles – While I am not exactly green, I hate waste. Instead of using plastic water bottles, we refilled our water bottles each time we went to the beach. We also used water bottles while traveling instead of purchasing drinks. A money saver.
Cooler – We brought both a large cooler and small lunch coolers as we weren’t sure which we would want for the beach. Since everything has to be carried to and from the beach each time, the smaller coolers were much more practical. Most of the drinks and a few snacks would fit in one. I used the second for my camera a couple of times. If a big cooler is need, I would suggest one on wheels.
Wagon or Cart – If our children were younger, I would have really considered a beach wagon or cart to carry everything. I saw several families using these and I can see why.
2. Clothing
We stayed in a hotel the first night. Instead of unpacking the entire van, I made a bag for the one night – pajamas, next day’s clothes, and toiletries. The other clothing stayed in the van in a separate bag.
If visiting the beach, instead of bringing a lot of play clothes, I encourage you to have two sets of swim clothes per person. We spent almost all our time on the beach.
I packed one set of nice clothes for beach pictures. I mean, that’s what families do when they go to the beach – take gorgeous photos to use as their Christmas card. Right? Remember the final point from the last blog post – #6. Do What is Best for Your Family? I realized right off that this would be unsuccessful. The kids would struggle to focus and give the “perfect family” pose causing me to get frustrated and potentially behave ugly. It wasn’t worth ruining a very fun and successful vacation for a because-all-my-friends-do-it photo. There will be other times for that. (Needless to say, our Christmas photo this year will not include a beach scene!)
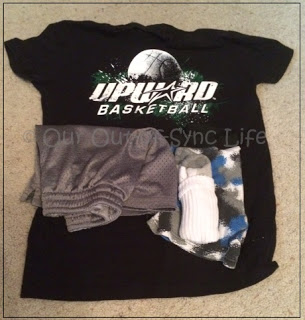
The kids gather their clothes and lay them by outfit on the floor. (We started this as soon as the kids could follow basic instructions.) I tell them how many pairs of underwear, socks, and then outfits needed. (Give one instruction at a time for younger kids.) In the image above you can see how Little Man laid out a shirt with the shorts, socks, and underwear on top. This makes it easy for me to scan across the floor to make sure he has everything.
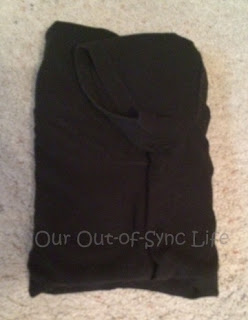
Then I fold up the bottom half of the shirt (over the shorts, underwear, and socks) and fold in the sleeves to sandwich the outfit together (pictured above). This process can be done for trips or when getting clothes out for the next day’s wear. The outfits are stacked in the suitcase in the approximate order of wearing.
3. Supplies
Undoubtedly you will collect various items along the way and need more space for the trip home. Whenever possible pack travel size containers because tossing the used containers this will free up some room when returning home. If you take opened liquid containers, take off the lid, fold a piece of plastic wrap over the lid, and replace the lid. This will prevent spills if the lid would happen to be opened.
I pack enough to get by with the idea that a Walmart is almost always within a short drive. Instead of taking a full bottle of Tylenol, I have enough to get us through the first dose, buying use time to acquire more. Instead of taking 7 pairs of clothes for 7 days, we take four sets and use a washer and dryer. This makes packing and unpacking much easier.
There you have our tips for beach visits or any vacation. To make it even easier, I have create a printable Packing List and a blank one to make it your own! Click here to print.
In the next blog posts, I will be sharing our meal plan, recipes, and an ingredients list which we used while at the condo.
Also read:
A Simple Way to Pack Your Child for Camp


Very helpful article! I will refer to your list next time I go holiday with my daughter. I think you mentioned all the necessary things for a vacation. Thanks for sharing! Greetings
Glad that it was helpful!